Having multiple administrators managing your Security devices is common practice, every user that is supposed to have access to a Firewall should have access to it. This needs to be controlled by an identity server; in this case, we will use Microsoft Active Directory.
Looking to catch up up the FortiGate Series? – Make sure you check the Main Page for it –> FortiGate – Configuration Series.
The Requirement
Ensure the Network Administrators Group and Help Desk Groups have access to Manage the FortiGate – Use AD for Authentication.
Integrating with Active Directory
First things first, we need to make sure our FortiGate is capable of retrieving information from AD such as Groups and Group Memberships and pass Authentication to Active Directory.
Preparing Active Directory
To make sure FortiGate can query AD, we need to create an account in AD; this account does not have to be a Domain Admin account. There is always the idea that this is required, but in reality, a Domain User account can querying the AD server for information.
I will then go ahead and create a quick service account in AD. I like to keep my Lab as real as possible so that you will notice an OU for Service Accounts in my AD server. This is the only requirement for now.

Before we go to the next step and before I forget, you will need the following information:
Domain Distinguished Name –> DC=lab,DC=local
Username Distinguished Name –> CN=ftnt ad,OU=_Lab Service Accounts,DC=lab,DC=local
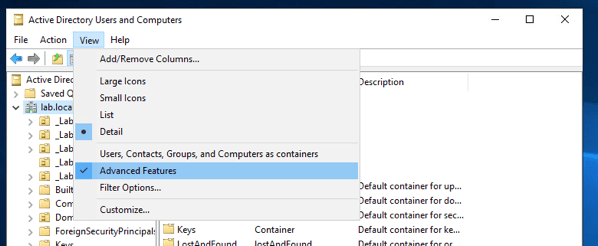
Where to get it from? easy, go into Active Directory Users and Computers –> Click View –> Select Advanced Features

This is required because you need the grab the Domain and User DN from the Attribute Editor, which is not available when Advanced Features is not checked.
Getting Domain DN from Active Directory
Make sure you right-click the domain, in my case lab.local –> Select Properties –> Select Attribute Editor –> Scroll down to DistinguishedName

We are going to do the same for our Service account

Create a Security Group and associate Admin users
Last, you will create a security Group; we will use it to add our Firewall Administrators to it. My lab will provide access to the Help Desk Administrator Account. The name of my group is Admin Users

FortiGate AD Configuration
With the information we collected from Active Directory, we are in a great place to start the configuration. One thing to note is that Fortinet has a nice document that tells you almost everything about the configuration but fails to show you where to find those DNs from AD – but no worries, I got you covered!

If your configuration is correct as far as Username/Password and all the DNs you need to enter, you should see a green checkmark after you click Test Connectivity. Now we are going to create the Groups in FortiGate.
Create Groups in FortiGate
This one should be easy; once all that configuration is behind us, we need to create Remote Groups that leverage Active Directory. Here is how
We will create a New User Group – it should look like the image above – Make sure Firewall is selected.

We are adding our Remote Group that will be the only Group from AD authorized to log in and Manage the FortiGate. From the previous step, this is going to be our Admin Users group. There are all sorts of ways to use the LDAP Explorer from FortiGate, but most likely, your Groups will be listed first, just like in the image. Make sure you right-click the Group and select “Add Selected,” then you click OK.

This is how it should look if you selected the group. If you did not select a group, the Group Namespace would be empty. Why I’m creating lots of emphasis on this one? Because I have been burnt a few times, please read the instructions.

We are almost ready, few more things to go through. We need to create the Administrators Association.
Create LDAP Administrator
This section seems symbolic and a bit weird to me because we are creating an Administrator Account. Instead, we are telling FortiGate to leverage our LDAP Group for authentication.
Here is how the configuration should look like.

Let’s see how this works, and we should be able to test it now
Testing and Troubleshooting
From our Windows 10 PC, we will access our FortiGate IP address https://xx.xx.xx.xx – We will use the User hd-admin and its respective credentials to test that this is working.

Login was successful. I had selected the “Match a user on a remote Server Group” and was getting authentication failed for troubleshooting. As soon as I corrected my error and selected “Match all users in a Remote Server Group” + Selecting the Firewall Admins Remote Group, I was in!

What is next?
I was able to create this quick series over the weekend, looking at more openings pretty soon; in case you missed some of the other posts on this series, feel free to check them out on my FortiGate – Configuration Series.
About the Author:
Andres Sarmiento, CCIE # 53520 (Collaboration)
Started working professionally in 2003, Andres is specialized in Unified Communications and Collaboration technologies | Enterprise Networks and Network Security. Consulted for several companies in South Florida, also Financial Institutions on behalf of Cisco Systems. Andres has been involved in high-profile implementations, including Cisco technologies, such as Data Center, UC & Collaboration, Contact Center Express, Routing & Switching, Security and Hosted IPT Service provider infrastructures.
