It has been a long time since my last practical/post, so I wanted to share what I have been working on
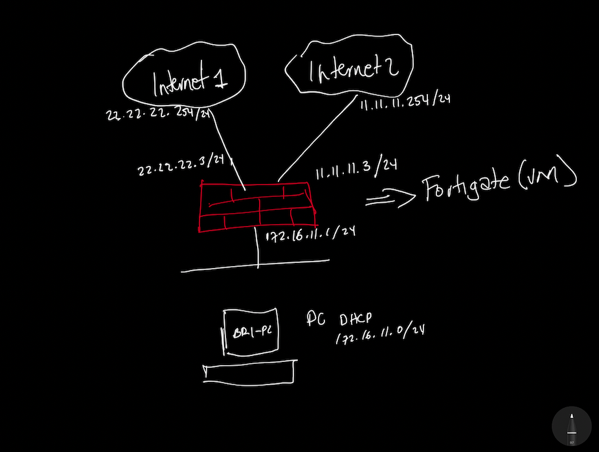
For my understanding and anyone reading this, I would like to set a quick standard for this lab; the best way to do it is by creating a quick diagram and a Plan
Looking to catch up up the FortiGate Series? – Make sure you check the Main Page for it –> FortiGate – Configuration Series.
The Diagram

The Plan & Requirements
- 1 Computer – Should be assigned to the Inside VLAN (172.16.11.x/24)
- 1 Fortigate – This one is connected to 2 ISPs – ISP1 and ISP2 will use Port 2 and Port 3
- The Inside Port will be port4 on the Fortigate
- Social Media access needs to be blocked
- Configure Security Profiles for Antivirus and Inspection
- Port 1 should be configured within the Management Network (10.1.100.x/24)
- VLAN 100 – Management
- VLAN 600 – Comcast
- VLAN 500 – AT&T
- VLAN 611 – LAN (Inside)
At the end of the configuration, the computer should be able to browse the internet and be unable to access Social Media sites.
Configure the VM
This quick post begins with a Management interface already configured. However, I need to make sure I assign this Fortigate with the correct VLANs assigned to the interfaces.

This particular case will use only 4 interfaces, Management, ISP1, ISP2, and LAN (FOr Inside)
Login to Fortigate
If you are using the trial license that activates once you install the VM, make sure you use HTTP to log in.


Configure your Time Zone
My lab is built on Virtual Machines, and System time is important. I had lots of issues when registering my licenses because, at the time of adding them to my box, they would not work because I had Pacific as the default Time Zone. It took a while to figure out.
You do this by clicking on the System Time; a Quick menu will come up, select Configure Settings in System –> Settings.

Here are my options:
You can also get to this place by Clicking Settings (Sidebar)

Interface Configuration
Now we move to the interfaces configuration; remember that for this configuration, we will adjust port 2 for the ISP1, port for the ISP2.
Internet 1 – I’m using Comcast for this one – but all the routing to Comcast happens in the backend,
Add an Alias to help you identify the interface; the Role is an interesting one because it allows you to modify important information based on what you choose, when selecting WAN, like in this port, there will be more options available, and some options will be disabled, as follows:
Set the role for the interface. Different settings will be shown or hidden when editing an interface, depending on the role.
- LAN: Used to connected to a local network of endpoints. It is the default role for new interfaces.
- WAN: Used to connect to the internet. When WAN is selected, the Estimated bandwidth setting is available. The following settings are not: DHCP server, Create address object matching subnet, Device detection, Security mode, One-arm sniffer, Dedicate to extension/fortiap modes, and Admission Control. And will show Estimated Bandwidth settings.
- DMZ: Used to connected to the DMZ. When selected, DHCP server and Security mode are not available.
- Undefined: The interface has no specific role. When selected, Create address object matching subnet is not available.
Reference: From The Fortigate Support Site

The address section is pretty self-explanatory. Enter your IP address and or use DHCP – The Administrative Section is also available to select which protocols are allowed.

After everything is configured, here is how it’s going to look like from the Interfaces view.

Adding DHCP server for LAN hosts, I decided Fortinet will be the DHCP server for my internal hosts. There was no need to modify much other than the range of IP addresses I want DHCP to lease at any given time.

Accessing Fortinet Support
Accessing support when playing with a new product is important; I consider Support, documentation, installation, and Administration guides the most important things when making a purchasing decision. I really want to get this one out of the way.
Links always change, so go to the https://fortinet.com page –> Look for Support at the Top or Bottom of the page –> Look for Self-Service Resources. In this case, Fortinet has a lot of tools to use:
Knowledge Base
http://kb.fortinet.com
Discussion Forums
https://forum.fortinet.com/
Product Documentation
http://docs.fortinet.com/
Installation Cookbooks
http://cookbook.fortinet.com/
Video Guides
http://video.fortinet.com
FortiGuard Security Portal
http://www.fortiguard.com
The page with all the resources can be found here –> https://www.fortinet.com/support/support-services/forticare-support
*** Again, links change over time, so make sure you know how to get there if there is any link I reference that does not work.
What is next?
The next post will go over the continuation of the configuration. We will configure Static Routes to the Providers. We will create the Policies that will be used to provide access to the internet as well as NAT Configuration.
About the Author:
Andres Sarmiento, CCIE # 53520 (Collaboration)
Started working professionally in 2003, Andres is specialized in Unified Communications and Collaboration technologies | Enterprise Networks and Network Security. Consulted for several companies in South Florida, also Financial Institutions on behalf of Cisco Systems. Andres has been involved in high-profile implementations, including Cisco technologies, such as Data Center, UC & Collaboration, Contact Center Express, Routing & Switching, Security and Hosted IPT Service provider infrastructures.
