TO pick up right where we left off, we will configure Static Routes to the providers, Security Policies (Allowing Traffic to the Internet), and NAT
Looking to catch up up the FortiGate Series? – Make sure you check the Main Page for it –> FortiGate – Configuration Series.
The Diagram

Static Routes ISP
This part of the configuration is enjoyable; Fortinet helps you save time. When you configure a static route, it will suggest an interface to be used as the next hop, without you having to do much other than making sure it is the right one. You can also use the advanced options to make sure and set the priority of your interface.

Priority and Distance are important because it allows you to enable Link Redundancy and Load-Sharing. There are multiple examples and use cases under the Fortinet Document Library.
In our scenario, ISP1 or Comcast will be my primary interface to go out to the internet. ISP2 or att will be my secondary. I should configure for both the same Administrative Distance –> 10 (Which is the Default), and the Priority on the Comcast Static route will be 0. The Priority on my att static route will be 10.
Comcast Static Route:

Att Static Route

Creating a Zone
But Zones help minimize the number of Policies you apply to similar traffic; sounds interesting, so that I will put it into practice. As an example of the policies, I have used multiple policies previously, as shown in this picture:

With policies, we should see only 1 Policy that will help with multiple and redundant Firewall Policies.
Create the Zone

Configure the Zone

Configure Firewall Policy and NAT for Internet
After we have created the zone, which was a breeze, we will use that Zone to create our Firewall Policy. This policy will permit traffic from Port 4 (LAN) to ports 2 and 3 for internet access. Also, this Firewall Policy will allow us to select NAT so we can use Port Address Translation. This one will be used for Devices on the LAN to go to the internet.
This is how we will create this policy.

For the NAT Piece, FTNT makes it really easy – turn on NAT and make sure you use the “Use Outgoing Interface Address.”

I’m not using any Security profiles as I have not configured any of them to leave the rest with Defaults.
Testing from our Branch1 Computer
We created quite a lot of configurations since our last post, and we have not tested any of them.
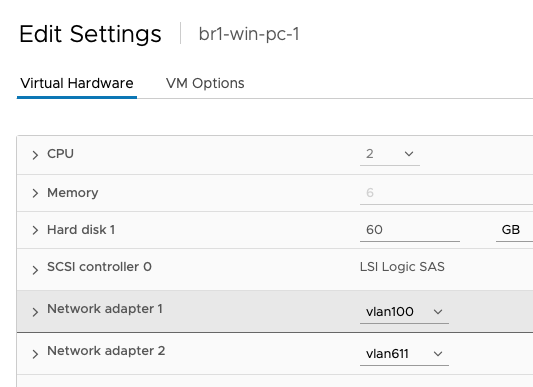
I do have a Virtual Machine running Windows 10 as part of this build. This machine needs to be connected to the LAN side of the Fortinet AKA: Port 4 – So I have to configure that on my ESXI Server as follows:

If you look closely, there is a VLAN100 interface – we will use that later when we need any other type of remote connectivity to the computer.
Checking for DHCP

Pinging public DNS Server

Browsing the internet

Making sure I’m using my primary ISP internet

Testing Link Redundancy
Now I will make sure I bring down ISP1 and see if ISP2 picks up the load

As a troubleshooting opportunity, I noticed that once I disabled my ISP1 port, the traffic was not going through; after a while of being constantly sent to the FortiGate

I then went to my Firewall policies and noticed that my Usage Bytes were not increasing, but the implicit Deny rule was moving up. This is a system with only one computer, so that is weird

Turn on Logs under the Implicit Deny Rule **Log IPV4 Violation Traffic**

Go to the main page of the Firewall policies and right-click the bytes section – Select Show Matching Logs

This will take you to the Forward Traffic Reporting, and that will show you a lot of Deny: Policy Violation

Double Clicking one of those violations will give you a hint of what is going on

The traffic is trying to use the Management interface to go out to the internet. After some digging, I noticed that the issue was the Priority/Distance configuration on my Static Routes, which is weird, but let’s take a look
Using the CLI from the Fortigate web console, type the command get router info routing-table static

This reveals that my Management interface has the same priority and Distance that my second ISP address – I want to change that and raise the Priority – Be careful as changing the Admin Distance may create issues.

Once I corrected that issue with the Static, I noticed I was able to go to the internet on my Windows 10 PC – This time using my AT&T IP address.

What is Next?
Our next post will be creating those Web Filtering Rules so that our users can’t access Social Media.
About the Author:
Andres Sarmiento, CCIE # 53520 (Collaboration)
Started working professionally in 2003, Andres is specialized in Unified Communications and Collaboration technologies | Enterprise Networks and Network Security. Consulted for several companies in South Florida, also Financial Institutions on behalf of Cisco Systems. Andres has been involved in high-profile implementations, including Cisco technologies, such as Data Center, UC & Collaboration, Contact Center Express, Routing & Switching, Security and Hosted IPT Service provider infrastructures.
