This quick lab is going to be about creating Zones, assigning them to interfaces, Management Interface configuration
Creating a Zone
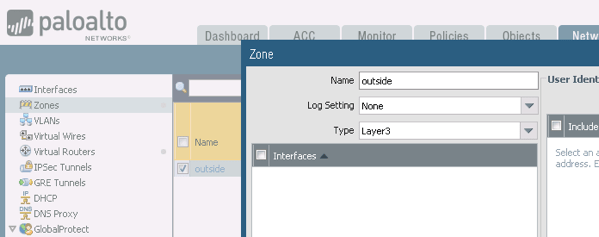
We will create the Outside Zone and we are going to add a name + selecting the type, nothing fancy, but later in the lab we will use it and go through configuring more features

Create an Interface Management Profile
We are going to quickly create a Management profile and assign to an interface
We are creating a name for it, assign the protocols that we would like to accept and then click OK – We use this to allo Managemetn protocols to the interface, which sometimes is needed when we are managing the equipment In-Band

Interface Configuration
We are going to configure Ethernet1/2 as a L3 interface, which is then going to work as the logical Default Gateway for our test PC in this scenario
We configured the interface as follows
Provided a Comment or description to it, assigned a new Zone, which we created by using the dropdown menu under Zone. The interface type was also selected as a Layer 3 Interface

For the IPV4 section we created a static IP address

For the Advanced TAB we selected the Management Profile we created earlier

We will do the same thing with interface1/3 – this time we are creating a new Zone called DMZ, assigning 192.168.50.1/24 as the IP ** This time we will create a new Management Profile and we will only permit PING to the interface.
Few things to notice
Previously as shown earlier in the Post, we went 2 different places to create the Zones as well as the Management Profiles. In this case when creating the interface we had the opportunity to create a new Zone, a new Management Profile – All of this without getting out of the Interface Configuration.
Outside Interface
While creating the outside interface we were able to assign the originla outside zone we created at the begining

I also wanted to add a Management Profile to the Outside interface, which is not good practice, but I wanted to make sure to add specific host having access to use Ping to reach out the outside of that interface. Again, you have the option of creating the Management profile right from the interface to make it easier on Management and Configuration.

vWire Interfaces
virtual wire deployment simplifies firewall installation and configuration because you can insert the firewall into an existing topology without assigning MAC or IP addresses to the interfaces, redesigning the network, or reconfiguring surrounding network devices
We are configuring the PAN-VM with 2 vWire Interfaces, which will be Ethernet1/4 and 1/5

In this case we configured the 2 interface’s type to be vWire and then we added them to the Danger zone

At this point only the 2 interfaces are configured with their type and zone, now we need to define the specific vWire interface, under Network –> Virtual Wire –> Add

Virtual Routers
Virtual routers are a function of the Firewall to maintain a Routing table, and keep association of routes, either Static or Dynamically. If your background is Cisco think of them as VRFs – In this case we will configure the Default Router to have all the interfaces associated with the Default VR

** It is important to mention that in most of the cases, you will be using a Static IP address for the outside or your Internet facing Interface. This time we used DHCP to get that IP address from the provider, and we also specified under the Outside Interface that we would like to “Automatically create default route pointing to default gateway provided by server” This is what is going to take care of the connectivity
Verifying connectivity
We are going to connect to the Firewall via CLI and we are running the following commands to verify connectivity and the routing table
admin@firewall-a> show interface ethernet1/1
admin@firewall-a> show routing route

Also lets test internet connectivity
admin@firewall-a> ping source 203.0.113.21 host 4.2.2.2

From our computer we still don’t have internet access, and the reason is because we don’t have a security policy assigned to our zone, nor any NAT rule. But we will complete this part in another post
What is next
Security Policies, Basic source NAT and destination NAT
About the Author:
Andres Sarmiento, CCIE # 53520 (Collaboration)
With more than 15 years of experience, Andres is specialized in Unified Communications and Collaboration technologies. Consulted for several companies in South Florida, also Financial Institutions on behalf of Cisco Systems. Andres has been involved in high-profile implementations including Cisco technologies; such as Data Center, UC & Collaboration, Contact Center Express, Routing & Switching, Security and Hosted IPT Service provider infrastructures.

